The best way to Germinate Gaillardia Pulchella Seeds

The best way to Germinate Gaillardia Pulchella Seeds

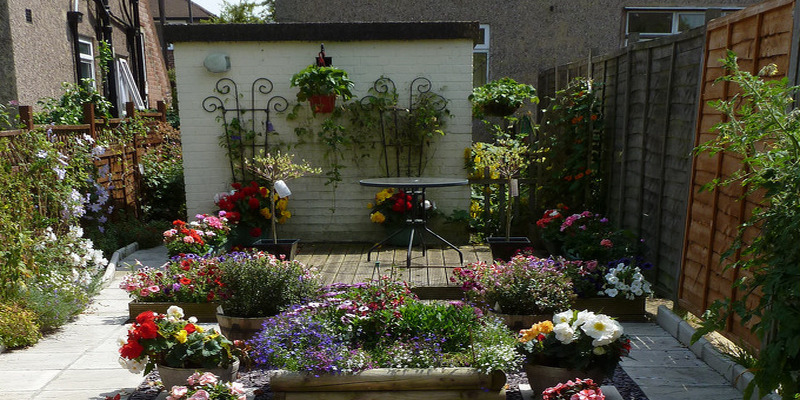
Gaillardia pulchella, generally called blanket, is a cheery, colorful . It creates a sea of colour similar to an Indian blanket when planted in drifts and meadows. It grows well in borders where it seems best in teams of seven or five, or interspersed with spring- flowers for time- blooms. Blanket is best started indoors, four to six months for borders and beds, or sown outside for meadows and big drifts. Seeds planted outside in spring might not germinate until the following spring in warm climates as the seeds germinate at temperatures around 70 degrees Fahrenheit. In climates that are warm temperatures might climb too large before the seeds germinate.

Sowing In-Doors

Fill pots that are little to within 1/2 inch of the top with set them on

Add sufficient water to moisten the soil. Discard any water that drains to the tray.

Place three or two seeds together with the soil close to the middle of every pot. The seeds require light to germinate, therefore don’t protect them with soil.

Slide the tray of pots and fasten the bag closed.

Place the bag of pots in an area with temperatures near 70 degrees Fahrenheit. The pots require coverage to mild, but avoid sunlight.

Remove the pots in the bag when the seedlings arise. Germination requires seven to 20 times. Place the seedlings in a sunny, ideally south-facing window.

When all risk of of frost has passed transplant outside.

Meadows and Drifts

Select an area in full sunlight. Blanket tolerates any kind of soil provided that it’s well-drained.

Prepare the site by digging or tilling to loosen the top few inches of soil. Smooth the the top of soil using a garden rake.

Spread the seeds evenly on the the top of soil. Use approximately 1 ounce of seeds for 10 lbs per acre or every 270 square feet.

See related

The best way to Grow Crassula Portulacaria

The best way to Grow Crassula Portulacaria

From a distance, crassula portulacaria has leaves that look like these on shrubs and standard Us variegated trees. Closer inspection reveals the leaves are fleshy and thick, like their family members that are succulent. Elephants frequently make the same error and feast upon the portulacatia, that’s the reason why it is nicknamed the “elephant bush.” Succulent enthusiasts appreciate portulacaria that is developing as it is a low-maintenance plant that usually thrives on neglect. A well-established plant will bloom.

Plant your portulacaria in a little pot that leaves the edge of the container as well as no over 1 one to two inches involving the root ball. Larger pots holds too much moisture near to the roots.

Use gritty, fast-draining soil, including blend or succulent. Include sand, pumice or alternative grit to the medium to assure the soil does not hold moisture in the event that you make your own blend. Dry circumstances are preferred by Portulacaria.

Choose a vibrant, sunny area with powerful but indirect light, like a south-facing window. Place the plant in the window-sill to keep its green colour instead of alongside the window. Leaves can turn red or yellow in the ideas — a colour change several folks choose. The leaves can be burnt by too much light. Before you get the correct spot experiment with all the location.

Water sparingly — as small as once each month. Saturate the soil with water, then wait several minutes for the soil. Empty the container once all the water has drained to the drip container. Water when the soil has totally dried up. Over-watering is the most easy way to eliminate a portulacaria. Don’t mist the leaves and stems.

Fertilize in planting season with fluid house-plant combine once-per yr, just prior to the hefty developing period commences.

Move into a larger pot the roots commence to grow from the pot holes as well as when the plant grows every one of the strategy to the edges of its own current home.

See related

The best way to Prune Zinnias

The best way to Prune Zinnias

Zinnias are summer- and fall- blooming flowers extended stems that offer both curb appeal and lovely bouquets and prized because of their brilliant colours. They’re indigenous to Mexico, attract birds and butterflies to the backyard, come in various shades and sizes and withstand with occasional watering. Zinnias transplanted and may be started from seed indoors, or direct-seeded in to well-drained soil. Provided that the soil temperature is 70 degrees Fahrenheit blooms will mature in six to seven months.

Prune zinnia blooms often to inspire development that is thicker and stems. Allow the plant to develop several inches. Back the stems utilizing pruning shears that are floral. Plants obtained fullsize from a nursery needs to be trimmed back to about one third of their peak.

Cut dead-head the blooms through the entire season or mature flowers for bouquets. Use pruning shears that are floral or snip the the top together with your fingers off. This can keep the plant producing blossoms in a constant price.

Layer the heights of zinnia hedges the crops that are again more often compared to plants that are front. This can add a stylish terrace look to the floral show that is multi-colored. This result may be improved by utilizing quick-stem zinnia types for extended and the front -stem types for the again.

See related

The best way to Install Double-Stick Tape on Carpet Tiles

The best way to Install Double-Stick Tape on Carpet Tiles

Tiles really are a contemporary and funky approach without without the need for tacking strips or adhesives to carpet a living area. These textured tiles come in various materials, colors and styles which can be mixed and matched or uniformly installed to produce ground artwork. Tiles are useful since they offer a barrier between the inside and ground room and guard hard-wood surfaces. Installing carpet tiles with double-stick tape is an easy and quick home improvement project which will make your real estate investment a retreat that is modern.

Measure the amount of the area and divide the the room by 50 percent. Snap a chalk line on the other side of the middle of the room using a chalk-line device. This line serves as the starting place for the carpet tiles, therefore each extra row is completely aligned with the next. Carpet tiles in rows outward on each side toward the wall.

Apply double- sided carpet tape to the backing on the under side of every carpet square. Unroll a little bit of tape, usually one to two inches long depending on the width of the tile, and slice the the tape with the edge of the tape dispenser or scissors. Place one strip on every corner of the carpet tile to support the the carpet set up. Till you are prepared to secure it to the ground do not eliminate the backing.

Carpet tape. Focus Floors suggests utilizing double-sided tape on each three to four rows of tile, as opposed to every piece. This functions provided that the rows that are taped support the the tiles in location. This approach is called the grid glue approach.

Remove the plastic strip on the rear of the double-sided tape. Place the carpet tile on the flooring, flush with all previous row or the chalkline, and press it onto the flooring area. Apply stress together with the heel of your hand to every corner of the carpet tile. Continue installation with each little bit of tile.

See related

The best way to Install an Exterior Dryer Vent Cover

The best way to Install an Exterior Dryer Vent Cover

The vent releases moisture, lint and heat out of your dryer. They are able to make your dryer perform badly, costing you additional cash for utilities in case these by-products backup. Vent handles that are outside are usually flimsy and lightweight plus they’re susceptible to breaking. The cover stops exterior cool and rain and warmth from entering the dryer duct, therefore it’s essential to to displace the protect quickly.

Cut the caulk seal round the exterior of your dryer vent protect that is current. Disconnect the versatile duct in the dryer pipe going going right through the wall of your dryer.

Unscrew the screws holding the cover. Pull the cover toward you. Usually it’ll be attached to the brief portion of of pipe which goes to the laundry area through the wall.

Remove the dryer pipe that is old. Press an alternative pipe having a cover connected through the opening. So the cover is properly positioned, turn the pipe.

Screw the pipe that is new . Apply a bead of exterior caulk across the edges of the cover to seal it. Water was dipped in by the caulk using a spoon. Clean lint out your dryer duct that is versatile and link it to the dryer pipe together with a hose clamp or screws.

See related